with Iterator GUI
The Iterator utility consists of a pair of tools: the Iterator Tool and the Iterator GUI. The GUI is optional, but recommended. Start it by clicking Tools/Iterator or by typing igui. The Iterator Tool runs from an a control file which can be generated, maintained, and launched from the GUI or other script.
The Iterator Tool enables you to:
- Launch multiple simulations,
- Sweep parameters over specified ranges and step sizes for recursions, or,
- Vary parameters randomly over specified ranges for Monte Carlo simulation,
- Change parameters without re-building/re-compiling.
- Aggregate the results of multiple simulations for listing and/or plotting.
- Plot histograms.
- Optimize control variables.
For detailed information on the Iterator Tool itself and the files it uses, see Iterator.
The Iterator-GUI assists in creating Iterator control files, launching the recursions, and viewing the results. The Iterator-GUI is organized to guide you through the process in logical order from top to bottom. Accordingly, the Iterator-GUI is divided into three parts:
- I. Set-up parameters/ranges and statistics to be gathered,
- II. Running recursions/simulation(s),
- III. Viewing results from the multiple runs.
Figure 1 shows the main Iterator-GUI window.
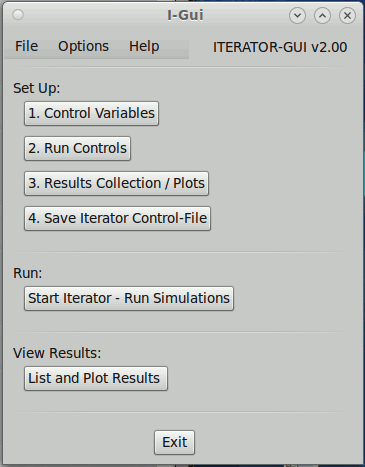
Figure 1 - Main Iterator0GUI window.
There are several ways of using the Iterator-GUI. Some may use it merely for creating an initial iterator.control file, and then make future modifications with a text editor, and/or launch simulations from their own scripts. However, the Iterator-GUI can also be used to modify and maintain iterator.control files, as well as launch simulations without ever editing a file or generating a script. It is flexible.
Invocation
Invoke either by clicking Tools / Iterator from CSIM's main GUI (or from SimView), or by typing igui & in your terminal window.
I. Set-Up
It is normal to start in the Set-Up section. The set-up consists of four parts:- Control Variables - which parameters to vary, and how,
- Run Controls - how many recursions to run, and what command to use,
- Results Collection - what results to gather, aggregate, or plot,
- Save Iterator Control File - final step to save above selections.
Set-Up: 1. Control Variables
Starting in the Set-Up Control Variables section by clicking the Control Variables button, pops-up the Set Control Variables window as shown in Figure 2.
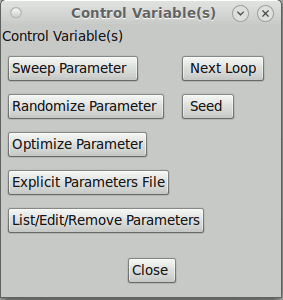
Figure 2 - Control Variables Set-Up window.
The choices are listed for controlling parameters.
You can:
- sweep parameters through ranges,
- randomize parameters for Monte Carlo runs,
- optimize parameters via the Iterator's built optimizer,
or, - explicitly set parameters to specific values from a parameter file.
Usually these choices are not mixed, but rather, they select the kind of simulation recursions to be run. The additional buttons to the right of Sweep and Randomize apply specifically to those choices, respectively. The Next Outer Loop button adds a loop between swept variables. (Otherwise they step together.) The Seed button gives control of the random number generator's seed for randomized parameter (Monte Carlo) simulations. Finally, the List/Edit/Remove button enables reviewing, editing, or removing the prior entries.
Once a type of parameter setting is selected, a sub-menu pop-ups with the appropriate option fields. In most of the menus, the first item is the parameter name to be varied. A convenience button, called Names, lists the available attribute names from your simulation, assuming you have successfully built the simulation and you are in the same directory where you built it. (Iterator-GUI scans the top_tab.dat file to get the names.)
For example, Figure 3 shows the Sweep window.
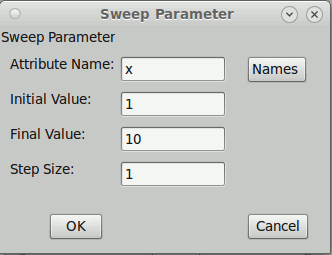
Figure 3 - Sweep Window.
Figure 4 shows the Randomize window.
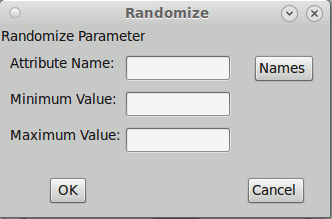
Figure 4 - Randomize Window.
Set-Up: 2. Run Controls
The Run Controls section allows you to set a limit on the number of simulations to run. Normally, run limit applies only to Randomized (Monte Carlo) simulations. It is not necessary to specify a number for Swept-Parameter or Explicit-Parameter simulations, because the sweep ranges, or the parameter file respectively, set the number of simulations.
Next is the run-command. By default, this is set as: sim.exe -batch, which is a good
setting for many applications. Remember that the simulation should be built as -nongraphical.
(The -batch option causes the textual simulator to come up running and quit when simulation is done.)
However, this may not apply to all simulations. So this option allows you to specify an alternate
run-command script, such as:
sim.exe < my_command.scrip
You may also use this line to set command-line options for the Iterator.
Figure 5 shows the Run Controls menu.
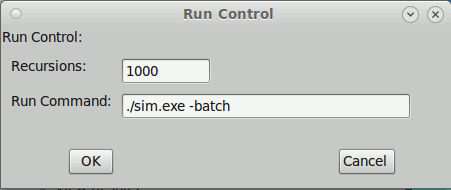
Figure 5 - Run Controls menu.
Set-Up: 3. Result Collection
The third set-up section enables you to specify how to collect the results from all the simulation runs. Clicking the Results Collection/Plots button brings up the Results Collection menu, as shown in Figure 6 below.
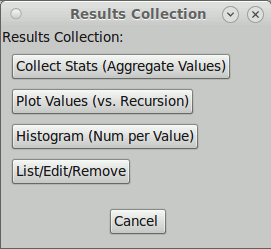
Figure 6 - Results Collection/Plotting menu.
As documented in the Iterator Tool document, each run of your simulation should
produce a result.dat file containing one line, with result values in columns separated by
white space.
Example result.dat file:
34 21.0 92.8 212.1
The Result Collection menus ask you to specify collection of results from the result.dat file
in terms of the column-number of the values. Columns are assumed to be numbered starting at one (1).
Presently, there are three options for collecting/displaying results:
- Collect Statistics or Aggregate - Will report the mean, standard deviation, minimum, and maximum value of the specified result (column-value) across all the runs. Report will appear in the iteration.log file, viewable either directly or from the View Results section of the Iterator Gui.
- Plot versus Recursion Number - Will cause a plot-file to be generated, which will plot the specified result (column-value) as a function of another column of the result file. The resulting plot file can be graphed either directly with XGRAPH, or by push-button from the View Results section of the Iterator Gui. (By making one of the columns indicate the recursion number, you can plot results versus recursion. You can do this by sweeping an attribute from 1 to the number of runs.)
- Histogram - Will generate a histogram plot of the selected column values. Histograms show the distribution of result values over a given range. They are calculated by dividing the range into bins, and plotting the number of values falling within each bin over the range. Don't be too concerned with getting the right ranges or number of bins. You can always regenerate histograms after you see the results, without re-running the simulation recursions, by going under the View Results menu.
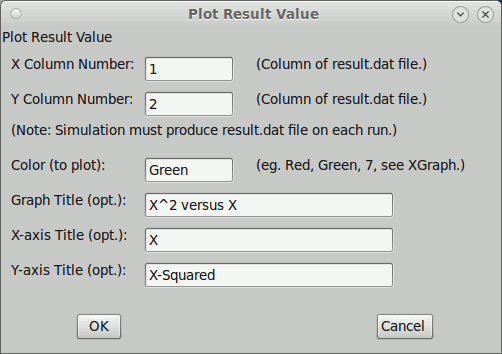
Figure 7 - Plot submenu.
Figure 8 shows the Histogram submenu.
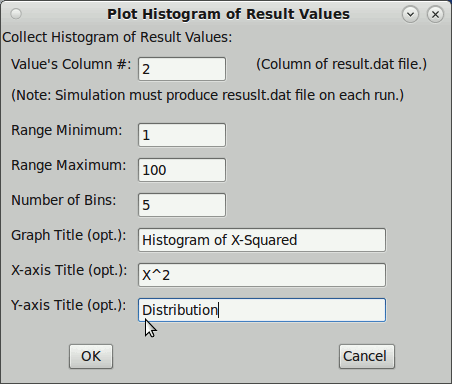
Figure 8 - Histogram submenu.
Finally, the List/Edit/Remove button brings up a menu that lets you review your collection selections, and edit or remove them. Figure 9 shows the List/Edit/Remove submenu.
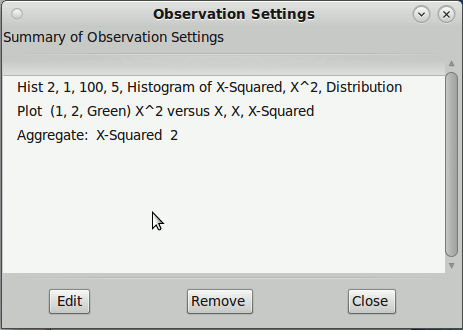
Figure 9 - List/Edit/Remove submenu.
Set-Up: 4. Saving your Set-Up Settings
After you have specified all your choices for run-control and results-collection in the above three sections, it is time to save you choices to the iteration.control file. Clicking the Save Iterator Control-File button on the main menu, will bring up a file browser as shown in Figure 10. By convention, the file is called iteration.control, but you can name it whatever you prefer. It is often handy to save different scenarios to unique names.
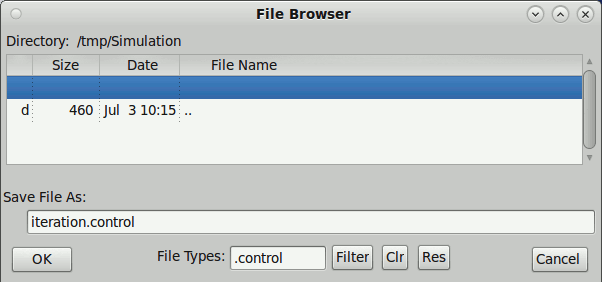
Figure 10 - File browser for saving iteration.control file.
(If you forget to save, the Iterator-GUI will remind you before you exit or attempt to simulate.)
II. Running Simulations
Once you have made all your recursion selections and generated an iteration.control file, it is time to launch the ITERATOR to run the simulation recursions. Clicking the Start Iterator - Run Simulations button from the Iterator-GUI's main window will pop-up the Run Simulations window shown in Figure 11 below.

Figure 11 - Run Simulations window.
From this window, it is customary to first review the iteration.control file that will be used. Do this be clicking Review Iterator Control File. A window showing the contents of the file will pop-up, such as Figure 12 shows. If you need to change anything, you have the opportunity to go back to the Set-Up section now, before beginning the simulation iterations.
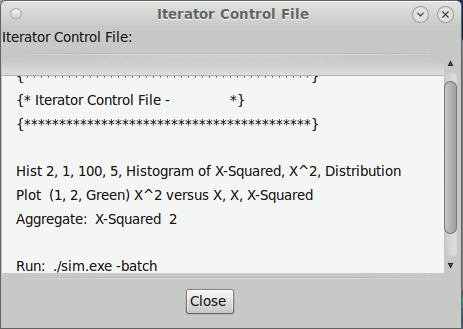
Figure 12 - Listing of iteration.control file.
Next, the middle of the window shows the command that will be used to launch the Iterator. This is useful to know in case you wish to launch the Iterator on your own, outside the Iterator-Gui, Or if you need to modify the command in any way. Otherwise, you can just ignore this line.
If everything appears satisfactory, then you can launch the Iterator by clicking -- Start Simulation Recursions --. The Iterator tool will then be invoked within a new Xterm window. The Xterm will automatically pop-up showing the Iterator progress. Large simulations with many recursions may take quite a while to run. Conversely, small simulations may finish their iterations so quickly, that you may barely notice the window popup and disappear.
III. Viewing Results
Once the simulation recursions have completed, you may view the results by clicking on the List and Plot Results button of the View Results section of the main window. You will see the menu shown in Figure 12 below.
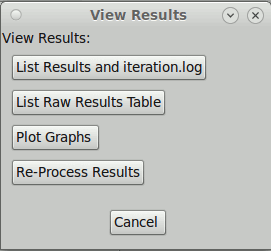
Figure 13 - Results Viewer menu.
To see any aggregated statistics you requested from the runs, as well as a general summary of the runs, click the List Results and iteration.log. This brings up a listing of the iteration.log file generated by the ITERATOR. You should see the mean, std.dev., min, and max. of any values you requested, as shown in Figure 14..
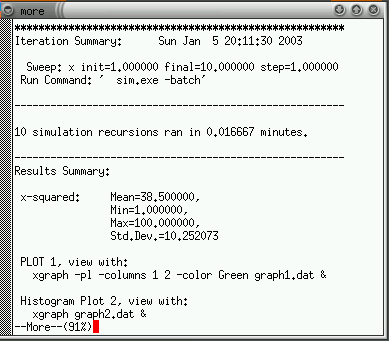
Figure 14 - List of aggregated results in the iteration.log file.
If you want to see the compilation of raw results produced from your simulation models, press the List Raw Results File. This lists the results_table.dat file. Each line corresponds to the output of a run. The results_table.dat file is produced by the ITERATOR by concatenating the result.dat files produced by each recursion. All plots and aggregations are calculated from the results_table.dat file.
To plot any results that you requested plots or histograms for, click the Plot Graphs button. You will see a list of the available plots, as shown in Figure 15. Select one and click Plot it. The requested plot should then appear.
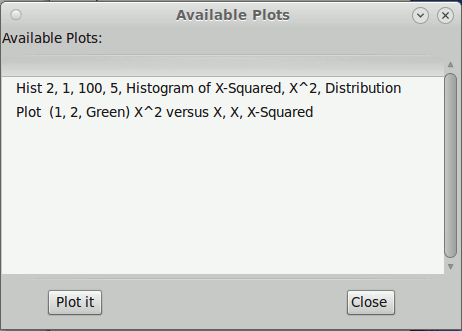
Figure 15 - List of available plots.
If you wish to extract different information out of a given set of simulation runs, you do not need to re-run the simulation recursions, assuming the information is in the results_table.dat. For example, suppose, you wish to change a graph title, or plot a different column against another, or -- perhaps add a histogram of an existing result-column --, then request the modified observations in the Set-up / Results Collection/Plots section above, and then click the Re-Process Results button in the View menu. This will cause the ITERATOR to re-extract the new results from your existing results_table.dat, without re-running the simulations. Because this is very quick, you can do this iteratively many times, as you examine your data in various ways.
Re-Loading Previous Control Files:
You may load a previous iteration.control by placing the file name as the first argument on the Iterator-Gui command line:
iterator_gui iteration.control
You can modify the command from CSIM's GUI under Tools/"Modify Commands",
or in your gui_setup file, or just type it on the command line.
This will bring up your previous selections.
Examples
A simple example can be downloaded from test_iterator.sim. [Some browsers may need to right-click to download.]This is the example used in the discusions above. It is a very simple (and pointless) one-box system model that contains a global attribute (in this case, a macro), called X. The model does nothing but write the result.dat file, each time it is run. It writes one line into the file. The line contains two values, X, and X squared.
The suggested example is to use the ITERATOR to sweep the X value from 1 to 10, by steps of one. And to plot the second column as a function of the first column. This should reveal the familiar Y equals X squared curve. A second aspect is to print the statistics of the second column (X^2), and a third would be to plot it's histogram. Suggested histogram parameters would be: range=0:100, #bins=5.
See: Detailed Instructions for Example.
.
I-GUI FAQ
| Q: | Is there a simple example for using Iterator? |
| A: | See Examples above. |
| Q: | How to use Iterator with performance models in "core_models" library? |
| A: |
You need to add some code that puts your results to a file called "results.dat",
usually at the end of your simulation. Normally you will also want to
save your independent variables (example: sweep parameter(s)) with your dependent
variable(s). For example, in the simple example above, X was the independent
variable, and X^2 was dependent on X. By saving both values to the results.dat file,
you can plot one versus the other.
If you are using the performance models (core_models), a good place to put your code would be in the "monitor.sim" model. That is a good "catch-all" model. There is a place toward the bottom of the model which waits for the end-of-simulation, and then does some closing chores. You could place code like the following there:
    WAIT( &CSIM_EndofSim, &NONQUEUABLE );   /* This line is in monitor.sim */

    /* Produce "results.dat". */
    {
     FILE *outfile;
     char value[30];
     float x;

     outfile = fopen("results.dat","w");
     if (outfile==0) printf("Error: Cannot open 'results.dat' for writing.\n");
     else
      {
       /* Get the value of your independent variable or control attribute into x. */
       CSIM_GET_ATTRIBUTE("your_control_attribute", value, 30);
       if (sscanf(value,"%f",&x)!=1) printf("Error: bad attribute %s\n",value);

       /* Send the values out to the file. */
       fprintf(outfile,"%g %g\n", x, pk_mes_latency );
       fclose(outfile);
      }
    }
The above example, saves the value of "pk_mes_latency" (which happens to be a
real variable) together with your control parameter to the results.dat file.
Rememember, this is just an example. You can do whatever you need, such as
saving multiple values, etc.. An example of saving four values, to make four-column
result files, would have an fprintf(...) like:fprintf(outfile,"%g %g %g %g\n", x, pk_mes_latency, last_proc_time, u_mes_latency/(float)(n_mesgs_recvd) );
|