The header section of the XML file contains several designators indicating the file's format and type. These appear for example as:
<xml version="1.0" standalone="yes">Comments may be placed in the file by encapsulating them within HEADER_COMMENT: END_HEADER_COMMENT. keywords. For example:
<csim_hw_file>
CGUIformatVersion 1.850000
HEADER_COMMENT:The topology of any module is encapsulated between the XML tags:
This is a comment.
Another comment.
.... etc..
END_HEADER_COMMENT.
<DEFINE_MODULE> module_name <rank>Immediately following the <DEFINE_MODULE> tag is the name of the module. (Remember that a module is synonymous for a diagram.) Following the module name is an indicator of the module's rank. The rank can be either top_diagram or child.
<DEFINE_NODE_INSTANCES>
. . .
</DEFINE_NODE_INSTANCES>
<DEFINE_TOPOLOGY>
. . .
</DEFINE_TOPOLOGY>
</DEFINE_MODULE>
The body of the module description contains two major parts:
<ins 1> node_name = type <attributes> <vrt> geometry </vrt>The first tag is the instance designator. There are currently two kinds of instances: 1 and 2. These indicate whether the node is a leaf-node (1) or a sub-module (2). The node_name is the instance-name of the node, and it must be unique within a module. The type is the designator of the node's type. It may be the name of a behavioral model in the case of a leaf-node, or another module diagram in the case of a super-node (sub-module). A super-node or sub-module are words for a hierarchical element.
or,
<ins 2> node_name = type <attributes> <vrt>; geometry </vrt>
After the type designator, any number of arbitrary attributes may follow. By convention, attribute tag names being with the letter a, example: <a_ct> (compute-time attribute), <a_mp> (map attribute).
Finally, the geometry information is placed between the <vrt> and </vrt> tags. The geometry numbers are the x-y coordinates where the node is to be displayed in the GUI. The position of a rectangular node box is specified by four vertices. The coordinate of each vertex is a pair of floating point numbers. (Other shapes may be supported by specifying any number of the polygon vertices.)
<lnk> node_name_1 port_name <to> node_name_2 port_name <attributes> <vrt> geometry </vrt>The first tag is the link designator. It is followed by the instance-name of a node within the module, and the port-name on that node to which the link connects. Following the <to> tag is the second node and its port to which the other end of the link connects.
If the link attaches to an external port of the module, then the module-name itself is used for the node-name, and the port-name is name of the external port.
After the second node and port, any number of arbitrary attributes may follow. By convention, attribute tag names being with the letter a, example: <_lt> (latency attribute), <a_tr> (transfer-rate attribute).
Finally, the geometry information is placed between the <vrt> and </vrt> tags. The geometry numbers are the x-y coordinates where the link is to be displayed in the GUI. Note that links may have any number of vertices (>= 2, of course). Each vertex is a pair of floating point numbers.
Remember that the link section must be closed by the </DEFINE_TOPOLOGY> tag.
Graph textual annotations are recorded with the tag <ANNO>, the coordinates of the beginning of the text string, followed by the text string (message). Example:
<ANNO> 2.190854 -1.447288 Message</ANNO>
Remember that the module-block must be closed by the </DEFINE_MODULE> tag.
The file must be closed by the </csim_hw_file> tag.
	<DEFINE_LIBRARY> libname1
	   <MODEL> model_name1 </MODEL>
	   <MODEL> model_name2 </MODEL>
	   <MODEL> model_name3 </MODEL>
	</DEFINE_LIBRARY>

	<DEFINE_LIBRARY> libname2
	   <MODEL> model_name4 </MODEL>
	   <MODEL> model_name5 </MODEL>
	   <MODEL> model_name6 </MODEL>
	</DEFINE_LIBRARY>
Note that this library construct affects only the GUI tool; not any of the other tools. It is a convenience feature only.
Presently, these library membership references must be encountered after the models have been defined. The typical use is to place these at the bottom of a reference library file, after the %includes of the models constituting the libraries. Then, users need only import the single library file (by reference) to have access to all the models in convenient form.
Example:
  DEFINE_DEVICE_INSTANCES:
          processor_A   =       MC6830
          processor_B   =       MC6830
  END_DEFINE_DEVICE_INSTANCES.

  DEFINE_TOPOLOGY:
       /* src-proc  /  port   to   dest-proc  /  port      dir     q-lngth   rate   ovrhd */
         processor_A   ioprt       processor_B   ioprt     hdplx     1       20.0   10.0
  END_DEFINE_TOPOLOGY.
        DEFINE_DEVICE_INSTANCES:
                proc1           =       iWARP
                proc2           =       iWARP
                controller      =       MC6830
        END_DEFINE_DEVICE_INSTANCES.
The connection list consists of 8 columns. The first four columns on each line contain a processor and port connection pair (ie. processor_1 port_x to processor_2 port_y). The processor names given must match those instantiated in the instantiation section (2).
The port names may be arbitrarily chosen, but become defined here for later reference by the behavior code in section (3).
All connections are point-to-point and must be unique. A common bus structure may be defined as a special device with multiple ports in which any incoming message is distributed to all ports.
The fifth column must contain either the keyword "smplx", "hdplx", or "fdplx", depending on whether the links are simplex, half-duplex, or full-duplex. In simplex mode, messages may travel in only one direction, namely only from the first to second device. In half-duplex mode, messages may travel in either direction, but only in one direction at a time. In full-duplex mode, messages may flow in both directions simultaneously, and the ports are treated as two separate simplex ports that run in opposite directions. In other words, simplex links are "uni"-directional, while half- duplex and full-duplex links are two types of bi-directional links.
The sixth column indicates the maximum queue length of the communications link. The queue length must be an integer greater than or equal to 1. It signifies the maximum number messages which may be queued up on a port before further send operations are blocked. A queue depth of "1" indicates that a sending device will be blocked if tries to write a new message to a port on which the previous message has not yet been read by the receiving device. If blocked, operation will resume whenever the message is read. A queue length of "2" allows two messages to be enqueued before blocking, etc. If you never want blocking in your model, then use a very huge number. The queue length is critical in issues of processor synchronization and memory buffer space.
The seventh column specifies the link data rate in terms of message length units per time unit. Each message has a length which is specified in each SEND operation. For instance, if the time units are defined to be uSec, the message length units are bytes, and the data rate of the link being modeled is 10-MB/s, the rate entry in the topology table would be 10e6 B/s * 1e-6 s/us = 10.0 B/us.
The eighth column is the fixed communication overhead time delay that a message should experience in transiting the link. This time delay is added to all message transfers regardless of message size.
The topological section is closed by the keyword "END_DEFINE_TOPOLOGY.".
The "*" serves as a wild-card or infinite speed attribute. In the first case above, consider a module with a link having a "*" attribute that connects to a link on another hierarchical module which has a finite literal value. The link attribute will then resolve to the finite value. It will not be considered a mismatch. In the second case above, any link attribute that does not resolve to a non-"*" value, will take on:
An example of a simple topology is shown below:
        DEFINE_TOPOLOGY:
        /* src-proc/port  to  dest-proc/port  dir  q-lngth  rate  fixd-ovrhd  */
          proc1   port_x    proc3  port_z    smplx    1    20.0   10.0
          shmem   d5         p10   y_data    fdplx    3    10.0    5.0
          sensor  i1        shmem  d0        hdplx   10    10.0    5.0
        END_DEFINE_TOPOLOGY.
Note: This topological specification style makes it easy to build an automatic
topology generator for regular topologies such as meshes, grids, etc.,
that can later be manually modified as needed.
Hierarchical topologies may be specified by defining the interconnection of modules. Modules may consist of devices and other modules. Each module definition contains a miniature "DEFINE_DEVICE_INSTANCES" section and a "DEFINE_TOPOLOGY" section, just like in the overall description. However, these sections are both enclosed by a common "DEFINE_MODULE" / "END_DEFINE_MODULE" keyword block. In the outer levels, the module names are used just like device names.
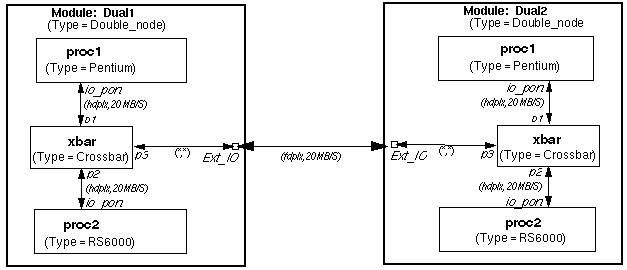
Example module definition:
     DEFINE_MODULE:   Double_node
           DEFINE_DEVICE_INSTANCES:
              proc1  =   Pentium
              proc2  =   RS6000
              xbar   =   Crossbar
           END_DEFINE_DEVICE_INSTANCES.
           DEFINE_TOPOLOGY:
              proc1  io_port     xbar p1                 hdplx  1 20.0  1.0
              proc2  io_port     xbar p2                 hdplx  1 20.0  1.0
              xbar   p3          Double_node Ext_IO_prt    *    *   *    *
           END_DEFINE_TOPOLOGY.
     END_DEFINE_MODULE.


     DEFINE_MODULE:   top_level
	DEFINE_DEVICE_INSTANCES:
            Dual1  =   Double_node
            Dual2  =   Double_node
        END_DEFINE_DEVICE_INSTANCES.
        DEFINE_TOPOLOGY:
            Dual1  Ext_IO_prt    Dual2   Ext_IO_prt      fdplx 1 20 1.0
        END_DEFINE_TOPOLOGY.
     END_DEFINE_MODULE.
Figure A1 below, shows the diagram of the example topology corresponding to the text above.
The device naming during simulation takes on a hierarchical "module/module/ device" syntax so that all devices in the system are uniquely identified. For example: /Dual1/proc1.
All ports that are not interconnected to other devices within the module being defined are considered to be external ports, and are thus connected to the module boundary itself. The direction, queue-length, rate, and overhead attributes of inter-module links are ignored. However, these attributes must match accordingly when resolved down to their ultimate device-device connections.
Modules must be instantiated at the outer level in order to be instantiated in the simulation. Otherwise, everything within them does not exist. Modules must be defined before they are referenced. A module cannot reference (contain) itself. These rules avoid infinite recursion.
Ports which are not connected to anything can be explicitly connected to "DEV_NULL" to avoid warning messages about unconnected ports during preprocessing. The default device "DEV_NULL" has two port types: "NC" and "null". "NC" stands for not connected, and will give a runtime error if a device tries to write or read from such a port. "null" is essentially a "bit bucket", and it will absorb anything written to it during the simulation. Reads will simply never return.

(Questions, Comments, & Suggestions: admin@csim.com)