VPT WinFrame-3D-Viewer Operation
Invoking WF-3D
It is helpful to define a convenient alias or shortcut to where you have WF-3D installed on your computer.For example, in Linux Bash-shell: alias wf3d=/home/bart/tools/wf3d.exe. Then invoke WF3D with your file(s) and/or socket(s) on the command-line.
For example, wf3d geom.dat .
(Microsoft seems to be incapable of using aliases with command-line arguments, so a remedy is to add the WF3D directory to your execution path.)
Basic Usage Instructions
Due to the rich variety of control operations supported, the WinFrame-3D (WF-3D) Viewer is modal - meaning that you must first select a control-mode, and then future mouse and arrow commands are interpreted according to the selected mode - until a new mode is selected.You can change modes by opening the control panel by clicking the Controls button on the upper-left of the WinFrame display, or by typing keyboard keys defined below. The simple control panel is designed for the most frequently used controls. More options are available from the keyboard list.
The primary modes are also listed on your computer screen when you first invoke WF-3D.
For example, mode (4) will interpret mouse (drag) movements to rotate the camera's view-point (camera's location)
around the camera's last aim-point (often the origin (0,0,0)), much like walking around a museum display.
Mode (6) will rotate the camera's aim-point, much like turning your head, up-down/left-right.
Mode (7) will zoom the camera toward or away from whichever direction it is pointing.
Below is a brief menu of the command modes:
Modes:  (Change by pressing number/letter key.)
 1. Move camera into scene (zoom) (z and x).
 2. Move camera around scene (x and y).
 3. Translate camera over scene (xy+aim).
 4. Rotate camera about aim-point (constant radius).
 5. Move camera's aim-point. (xz).
 6. Rotate camera's aim. (y-x/z).
 7. Zoom camera to/from pointing direction.
 8. Move last-added object (xz).
 9. Rotate last-added object (y-axis).
 s. Start/stop AutoPan - Automatic camera rotation about origin.
 t. Start/stop AutoTour of outer loop..
 z. Start/stop AutoZoom - Automatic zoom toward origin.
 p. Snap Picture.
 c. Show Camera Coordinates.
 e. Show Frame Rate stats.
 f. Freeze object motions.
 m. Meta functions.
 h. Help.
 q. Quit.
Pressing the number or letter shown (with mouse focus in the WF3d window), either puts the viewer in the mode to control the specified attribute or carries out the intended function.
For example, pressing 1 causes left-right arrow presses (or mouse left-right movements) to move the camera position along the Z-axis toward or away from the origin. Pressing 2 causes the arrow keys (or mouse) to move the camera in the X-Y plane. With a little practice, you can become adroit at manipulating the camera's position and pointing direction, around and through a scene.
Other commands, such as p cause a picture to be snapped of the current scene, without altering the pointing mode. Pressing c causes the camera's coordinates to be displayed. This is handy when trying to find a good initial camera setting to place in a file.
The letters s, t, and z put the camera into preplanned trajectories of continuous motion. S Scans around a circular orbit of the origin at whatever radius you position it. You can even change the radius as it scans. T takes the camera on a Tour which follows a similar orbit, but looks ahead in the direction of motion, instead of toward the center. Z Zooms the camera toward the origin, where it begins a slow rotation looking out around the horizon. Pressing any of these letters a second time, stops the camera's motion. Pressing it again resumes it. You can switch smoothly between motions by simply switching between them directly.
Meta Functions
Less frequently used commands are relegated to the second level Meta
menu. Go into / or out-of the meta mode by pressing m.
Below is the Meta-menu:
   Meta Functions:
         1. View Angle (FOV)	- (Alter by dragging mouse left-right.)
         2. Near-Field Limit	- (Alter by dragging mouse left-right.)
         3. Far-Field Limit	- (Alter by dragging mouse left-right.)
         4. Toggle Fog On/Off
         5. Increase/Decrease Fog by +/-
         m. Toggle back to non-meta mode.
Some other arcane commands are not listed, such as:
- f - Freeze/unfreeze the movement of all entities (not including the camera).
- i - Identify-Object by Mouse Click. See below.
- - - Reverse camera panning direction.
- ~ - Slow camera panning speed.
- + - Increase camera pan speed.
- r - Adjust the viewing Rate. In this mode, use arrow keys to dilate or compress time (slow-down or speed-up the animation), while the viewer is running. Dilation or compression amount is displayed. See also -speed xx command-line option, for setting speed at invocation time.
Selecting Objects by Mouse - Identify-Object Mode
You can select or identify objects in WinFrame-3D by clicking near them with your mouse. Go into "Identify-Object" mode, simply type "I" or "i" inside the viewer. Then clicking your mouse near any object will identify it. It will print to the screen the name of the object you clicked closest to (relative to the object's origin point).If you are connected to a socket, it will send a tag of the following format to your connected program:
<SelectedObject name=??? x=?? y=?? z=?? />... Where the question marks (?) represent the respective data, being the object's instance-name, and xyz-location.
You will want to go out-of "Identify-Object" mode to move around. Simply type "I" or "i" to toggle out-of, or back into, that mode.
Note - There could be some confusion if your objects were defined at an offset relative to the origin at definition time. For example, suppose an object-type was defined with all its vertices laying in the region 90-100 in X. Then you instantiate the object at 4500 in X. The object origin (original 0.0) will be at 4500, but the object vertices will appear at 4590-4600, due to the defined-in offset. Clicking near 4500 will select the object, because that is the object's assumed center. However, clicking out at 4600 may select another object and create some confusion. Two remedies follow:
- Define your objects with their centers at 0,0,0.
IE. If your object is 20-wide, define the vertices to lie between
-10 and +10, so the center is at 0.0.
Instantiating objects in WF-3D merely translates the definition
coordinates, relative to the defined origin, to the instantiated
location. Likewise with movements.
If you define objects origin-centered, they will also rotate nicely.
Otherwise they will appear to orbit the reference origin while rotating.
- As a debugging aid, invoke the viewer with verbosity set to 1.
Example:
wf3d geom.dat -v 1This will then display the raw coordinates it thinks you are pointing to, the coordinates of the nearby object reference points, the difference (distance) in projected point error from the objects and your mouse, and it will show you visually with blue lines where the reference points on the near-by objects were, and with a yellow line it will point to the origin of the selected object.
Following Objects as they Move - Follow Mode
You can follow a moving object by typing k and then clicking on it with your mouse. If you click close enough, the object's name will be printed on your terminal window, and the camera (your view-point of the scene) will point directly at the object. The camera position will move toward the object, and stay about 100 units away. As the object moves, the camera will move and change its pointing direction to follow the object at that distance.You can change your viewing orientation relative to the object, or your viewing distance from the object by the normal mode keys (4) and (7), respectively, and then dragging the mouse.
If while selecting the object, you do not click close enough, then you may need to click again. Pointing accuracy improves as the object is closer to the center of the screen.
Design Aids
While designing 3D objects or scenes, the following features may aid in understanding coordinates and rotation angles, as well as how to find and set the correct values.
- Pressing "u" will superimpose X-Y-Z axes lines converging at the (0,0,0) origin.
- Pressing shift-9 will pop up the Object Manipulator window.
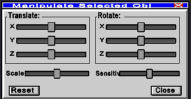
Once selected, sliding the XYZ and rotation controls will affect the object accordingly. You can see the translation or rotation values being applied in your text window.
See also: WF3d