Hardware / Software Modeling:
An Example
This document covers an example of using CSIM to model
the performance of two candidate software applications on
two candidate hardware architectures.
It emphasizes the versatility of separating the software application
description from the hardware architecture's description, by first mapping a simple
application onto one architecture, and then moving it (without modification)
to a second architecture. Conversely, the document demonstrates
how a second software application is mapped the either architecture,
again without modification of the architecture model or the software descriptions.
This example is actually chapters 2 and 4 of a more complete document,
CSIM as a Performance Modeling Tool: An Overview.
The example includes the construction and interpretation of a
performance model. Details of the CSIM modeling language are left
to the documenation at: CSIM Docs.
Table of Contents
- Building the Hardware and Software Models
- Running the Simulation
- Analyzing the Results
- Post-processing Analysis
- A Performance Model Example
1.0 Building Hardware and Software Models
The CSIM distribution includes a number of demonstrations in the
directory csim/demo_examples. This section focuses on the
performance modeling demonstration of Multi-Computer Architecture Performance Modeling.
The example includes two
'hardware' models and two 'software' models and resides in the
demo directory 'csim/demo_examples/Lesson_Models_for_HwSw_Performance_Modeling'. Below are
instructions for building the simpler of two software models on
the simpler of two hardware descriptions.
Basic Setup
(1) Make sure you have sourced the csim/tools/setup file, as described by your custodian.
(2) Create a directory where you have write access.
Then copy the example performance model directory contents to that directory:
Example:
mkdir ~/myperfmodel
cp -r $CSIM_ROOT/demo_examples/Lesson_Models_for_HwSw_Performance_Modeling ~/myperfmodel
(3) Move into your directory where the models are:
Example:
cd ~/myperfmodel
Build the Hardware Model
(4) Open the GUI on the arch1.sim file.
Type:
gui arch1.sim
This will open the simpler of two
'hardware' architecture models in the CSIM graphical tool and display
a diagram similar to that in Figure 1.
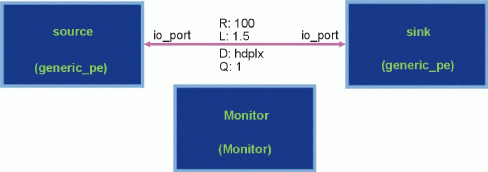
Figure 1 - arch1.sim. A Simple Hardware Model.
(5) Choose the menu item "Tools->Build Simulation" to compile the
HW architecture model.
(6) Choose the menu item "Tools->Build Routing Table" to construct
the network routing information tables.
Alternative Build Note: Steps four through six can be substituted
for the following three non-graphical commands executed from the C-shell:
csim arch.sim
sim.exe -netinfo
router netinfo
Nothing about CSIM requires use of the GUI. Non-graphical commands are often quicker.
Build the Software Model
(7) Choose "File->Open->Open a new file" and choose the file "flow1.dfg".
This provides a graphical view of the simpler of two SW models and yields a diagram similar
to that in Figure 2.
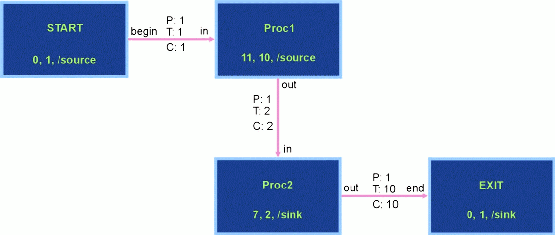
Figure 2 - flow1.dfg. A Simple DFG.
(6) Choose the menu item "Tools->Build DFG SW" to build the simple 'software' model.
(7) Choose the menu item "Tools->Plot Ideal TimeLine" to see the ideal timeline.
2.0 Running Simulations
(1) The performance modeling simulation can be viewed from the
perspective of either the hardware or software. By default, the
simulation is viewed from the hardware perspective and the default
graphical window depicts the hardware architecture: a graphical
description similar to Figure 1.
This can be changed to view the simulation from the data flow
graph (DFG) representation (a view similar to that in Figure 2).
To accomplish this, type setenv SIM_GRAPH flow1.dfg before
starting up the GUI.
The simulation view can be changed back to the hardware
perspective (before starting the GUI) by typing unsetenv
SIM_GRAPH or equivalently setenv SIM_GRAPH arch1.sim.
(2) If not in the GUI, type gui arch1.sim or gui flow1.dfg.
Choose the menu item Tools->Run Simulation. This step could
equally have been executed from the command line via sim.exe.
(3) Optionally choose Animation->Animation Types->Nodes:
Concurrent Activities and/or choose Animation->Animation
Types->Links: User/Model Defined. These commands override
default device and node coloring discussed in Run-time analysis
below and are less useful for models (such as these) that use
"core_models" components.
(4) Click on "Run/Continue".
(5) When asked (at the UNIX shell window), choose a verbosity
level. This verbosity level controls the detail of command-line
feedback the simulation will provide about the state of messages
in the simulation. Zero is typically chosen to minimize output
and speed up the simulation.
3.0 Analyzing Results
The simulation shows the flow of messages from creation to
destination by coloring the various device and DFG objects. The
simulation can be slowed down by adjusting the "Speed Slowdown"
slider, stopping, stepping through the simulation, or crawling
through the simulation per simulation control panel buttons.
These and other GUI-accessible controls are described in CSIM
documentation (see The CSIM Graphical Simulator).
When viewing a general simulation or plotted output, colors have
the following meanings:
Network Switching Links are:
- Purple when unused. They are thin before their first use or when
a window is refreshed. They become thick after any use and remain
that way until the window is refreshed (usually by changing
views).
- Yellow on each segment where a packet request has been made and
where each wormhole has been established. The yellow back tracks
leaving purple behind its retreat-all the way to its destination
if the wormhole is denied.1
- Orange is shown for control messages (such as token transfers) in
network models.
- Blue when the first packet of a given message block passes across
a link.
- Green if data flows down a segment unencumbered.
- Red to show contention if data is already flowing down a segment
when a second data stream attempts to create a wormhole down that
same segment.
HW Generic XBar Links are:
- Purple when unused.
- Green when data is flowing through the device. (There is no
contention on this XBar model.)
- Network XBars and NIC/NIU devices are:
- Black (uncolored) when unused.
- Blue when the device is processing its first packet of a given
message block.
- Green if handling a control message (not implemented
consistently).
- Red when the device is being used by further packets.
HW Devices, HW Modules, SW Nodes, and SW Supernodes are:
- Light cyan with a thin border for devices and nodes and a thick border for modules and supernodes.
- Blue when they initiate the first packet of a given message
block.
Other devices listed in the timeline plots including the
generic_pe and multi_priority_pe are:
- Color-coded by a mapping
from the LAST letter or digit of the data flow diagram node name
that is providing the device's instructions.
- Timeline plot
devices supporting an unnamed monotonic (an alarm that goes off
periodically to restart a data flow: say at 33.3ms) are pink.
In addition to an object's color, a link's simulated values can
be obtained during simulation runtime by choosing a link and then
choosing "Options->Examine Link". Similarly, a list of all active
links can be obtained by choosing "Options->List Active Links".
4.0 Post-processing Analysis
There are a number of ways to analyze simulation output. For
instance, any number of specialized 'hooks' can be placed into the
'C' code of hardware devices that might output information into an
external file or provide graphical information at runtime (e.g., a
'meter'). Below are six methods that provide post-process
information using existing simulation output. Most of the
post-processing analysis tools use the xgraph plotting package. This package processes data files
created by the simulation.
(1) To view the run-time-generated process timeline, choose
"Tools->Plot Proc Timeline" from the GUI. Equivalently, type
"xgraph ProcTline.dat &" from the command line.
(2) To view the run-time-generated timeline as well as the network
utilization paths, choose "Tools->Plot Comm+Proc Tline" from the
GUI. Equivalently, type "xgraph Spider.dat ProcTline.dat &" from
the command line.
(3) To view system-wide contention levels, type "view_contention
LinkTline.dat" from the command line. (This step can not easily
be processed directly from the GUI.) The view_contention
executable creates a file 'LinkTline.hst' that can be viewed
graphically with the command "xgraph LinkTline.hst". Other
contention analysis options are described at
Contention Viewer.
(4) To create a specialized plot of simulation events, use the
event tool. Like the contention analysis tool, this involves
processing a text file: type "timeline EventHist.dat" and respond
to a series of data-generated questions. The results are then
viewed by entering "xgraph EventHist.tln". This is a powerful
tool but it is also fairly complicated. Instructions for its use
are available at Time-Line.
(5) View the ASCII file 'summaries.dat' for processor, link, and
port utilizations. Note that these statistics are collected
between the default times "Time1" = 0 msec and "Time2" = 1,000,000
msec. This time window can be changed by editing the file
"csim/model_libs/core_models/parameters.sim".
(6) To create a supplemental event history file, run the
simulation at high verbosity and pipe the output to a separate
file. This is accomplished as follows:
- From the GUI, choose "Tools->Modify Commands->Run
Simulation" and alter the command line to be "./sim.exe -V 10 >
simoutput.txt &". Alternatively, type "sim.exe -V 10 >
simoutput.txt &" directly from the command line. Choose a number
more or less than ten to increase or diminish the quantity of
information output.
- View this (usually enormous) file directly or use the
grep tool to filter the information. For instance, to obtain a
file containing all activity on a device 'source', type "grep
source simoutput.txt > anotherfilename.txt". To view all of the
activity occurring to a message with ID number 2, type "grep mid=2
simoutput.txt | more".
5.0 More on the Performance Model Demonstration
The simple demonstration performance model used above was
constructed by users to exploit CSIM's performance modeling ability.
This description does assume a basic understanding of CSIM. An
overview of CSIM and links to CSIM documentation was
provided in An Overview of CSIM above.
Any CSIM developer can develop useful performance models using
only the CSIM GUI and the device models provided with advanced CSIM
distributions. Such a developed system typically consists of two
user-generated files. The first contains a topological
description of the modeled system's hardware. The second contains
a data flow graph (DFG) representative of software instructions
for the hardware model. By convention the 'hardware' file is
given an extension ".sim" and the 'software' file is given an
extension of ".dfg".
One such simple representative system resides in the directory
"csim/demo_examples/Lesson_Models_for_HwSw_Performance_Modeling". This directory contains five
files and one directory:
- arch1.sim: A simple architecture description. See Figure 1.
- arch2.sim: A slightly more complex architecture description. See
Figure 3 and Figure 4.
- flow1.dfg: A simple data flow graph. See Figure 2.
- flow2.dfg: A slightly more complex data flow graph. See Figure 5
and Figure 6.
- flow2map.csim: A hardware mapping file used by flow2.dfg. See
Listing 1.
- programs: A directory that can hold simulation instruction files
(".prog files") generated by the scheduler. (Refer to
Scheduler.)
The remainder of this subsection describes each of these files
and how they can be executed. As will be shown, some of the power
of CSIM for system performance modeling is demonstrated by the
application of either DFG (either .dfg file) to either system
architecture description (either .sim file).
5.1 A Simple Architecture File: arch1.sim
A diagram of the "arch1.sim" file is included in Figure 1. In
these diagrams, boxes represent devices or modules and connecting
lines represent communications links. Devices are behavior
description files written in standard 'C' that contain any number
of CSIM constructs (discussed in The CSIM PreProcessor).
Modules (shown in Figure 3) are topological descriptions
representing a grouping of devices, (other) modules, links, and
include one or more ports that represent an external interface.
The CSIM event simulator will pass messages through links into and
out of devices. Links restrict the flow of these messages in time
by user-modified parameters. These parameters include transfer
rate 'R', link latency 'L', link flow characteristics 'D' (full-duplex
vs. half-duplex vs. simplex), and message queue size 'Q'.
The devices may create, modify, or destroy messages.
Devices can be written by the user or obtained from a library.
All devices in Figure 1 through Figure 4 are part of advanced CSIM
distribution packages and are located in the core_models subdirectory.
Both library and user-generated devices can be imported into the
model using the GUI by selecting `File->Import->by Reference to
File' and choosing a desired device file. (For a description of
the GUI, see The CSIM GUI: Describing 'Hardware' Models and
Data Flow Graphs.) Behind the scenes, this GUI import action
places reference lines into the arch1.sim file of the form:
%include ../../core_models/generic_pe.sim
The remainder of the arch1.sim file contains Extensible Markup
Language (XML) instructions describing the architecture's
topology. These XML instructions are fairly easily reverse
engineered and include information about where in a diagram the
device, module and link the components are located, what behavior
description files are associated with each device block, and how
the components are connected (via links).
In Figure 1, the device titled "Monitor" reads software
instructions generated by a DFG and sets up an environment to
track simulation results useful for post-simulation analysis. The
"generic_pe" devices named "source" and "sink" process this DFG
'software' to determine when, how large, and how many messages
they will create and send out or receive from their port
("io_port"). The generic_pe device, described in Device Models,
is one of several devices that can process `software' files-that
is, alter their simulation behavior via runtime instructions.
Further, the DFG is only one of several ways that these
'programmable' devices can be controlled. In general, devices
containing the CSIM preprocessor instruction
"DEVICE_CLASS=(programmable);" are in some way 'programmable'.
Such devices include "generic_pe.sim", "multi_priority_pe.sim",
"c40.sim", "sharc.sim", "multi_task_pe.sim" and "dynamic_pe.sim".
Concerning Figure 1, a DFG will stimulate the timing and movement
of data between the two specified "generic_pe.sim" devices. All
data that is passed between these devices is limited to moving at
a rate of 100 MB/second (100 bytes/msec after incurring a latency
of 1.5 msec). Because the link is half-duplex ("hdplx"), data can
only flow in one direction at a time. The queue length value of
one implies that the link will not place unread messages into a
buffer. This means that the "sink" must read a message sent by
"source" before a second message can be sent.
5.2 A More Complicated Architecture File: arch2.sim
The architecture in Figure 3 includes a module, named
"dual_processor", depicted in Figure 4. Modules are graphically
differentiated from devices by the width of their (light blue)
border and the existence of external ports (depicted as small
orange squares). The external ports are named by the attached
link. Connections with a higher level arc use the same name;
e.g., "port1". Modules can be used to apply "instantiation
variables" or "instance attributes" to a part of the architecture.
These are variables whose values are locally applied to devices
contained within a module. However, in all other ways devices
and arcs nested in modules act as though the entire architecture
were flattened into a single layer. This flattened view can be
imposed on an architecture at simulation run-time by clicking once
on a module and choosing `View->Flatten Selected Nodes'.
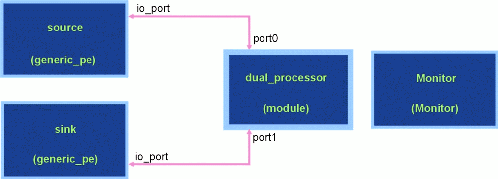
Figure 3 - arch2.sim. A Slightly More Complex Hardware Model.
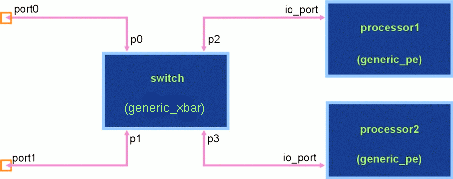
Figure 4 - The arch2.sim dual processor module.
The architecture in arch2.sim (Figure 3) is similar to that in
arch1.sim (Figure 1). The similarities ensure that DFGs designed
for arch1.sim will also operate on arch2.sim with no alterations.
The reverse is true as well with a qualification: all DFGs
designed for arch2.sim can be re-mapped onto arch1.sim through use
of a mapping file. This mapping, in fact, is the purpose of the
included file "flow2map.csim" discussed later. As mentioned, the
difference between the Figure 1 and Figure 3 architectures is the
module named 'dual_processor'. This module contains a
point-to-point switch allowing simultaneous information flow over
independent pairs of attached links. Thus information can flow
from the top-level device "source" to the module device
"processor2" at the same time that information is flowing from the
module device "processor1" to the top-level device "sink".
5.3 A Simple Data Flow Graph: flow1.dfg
The (software) DFG depicted in Figure 2 can be associated with
either of the above (hardware) architecture files (arch1.sim or
arch2.sim). CSIM requires a unique START node in all DFGs to mark
the beginning of a flow of data. The "START" node in this graph
is assigned to a top-level 'hardware' device named "source". Of
course it is convenient for a 'programmable' (generic_pe) device
named "source" to exist as it does in both Figure 1 and Figure 3.
DFG-generated instructions contained in the connecting arc require
the device associated with this START node to move a single byte
of data to the hardware device assigned to the DFG process named
"Proc1". In this case, the "Proc1" node is assigned to the same
hardware device as "START" (i.e., "source"). When two consecutive
nodes in a DFG are mapped to the same source, CSIM knows the data
stays local to the processor and doesn't consider
moving the data indicated by the intervening arc. (Think about it: If it did,
over what path in the associated architecture would a device send
data back to itself?). Instead, CSIM ignores the send and receive process specified
by the arc and only imposes specified delays that may be indicated
by the nodes. In this case, the "START" node imposes a zero msec
delay-i.e., no delay. The node "Proc1" instructs the hardware
device "source" to delay 11 msec and place a single byte of data
into a queue (P=1). The delay and depositing of a byte into a
queue is repeated 10 times. Whenever the data queue accumulates
two bytes (T=2), those two bytes are sent by the hardware device
"source" to the hardware device "sink" assigned to the node
"Proc2". The device associated with this latter node 'consumes'
those two bytes (C=2). The device associated with "Proc2" then
follows the instructions provided by the "Proc2" node; in this
case begin by delaying 7 msec. Because 10 bytes are placed
sequentially into a queue that is 'triggered' every other byte,
the node "Proc2" 'fires' five times. The simulation controlled by
flow1.dfg will end whenever the "EXIT" node is reached.
5.4 A More Complicated Data Flow Graph: flow2.dfg
The DFG file "flow2.dfg" depicted in Figure 5 differs from the
simpler file "flow1.dfg" in three primary ways. First, it
contains a 'supernode'-the DFG analogy for a module. This
supernode, called "SuperNode", is depicted in Figure 6. Second,
some nodes send messages to and receive messages from more than
one node. Third, the nodes are all assigned to indirect variable
names such as "Asource". A mapping file, flow2map.csim, handles
these assignments and is discussed in the next section.
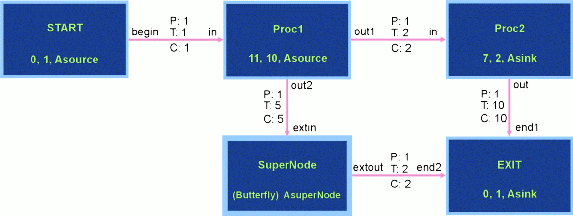
Figure 5 - flow2.dfg: A More Complicated DFG.

Figure 6 - A supernode named "SuperNode" and assigned the type "Butterfly".
The DFG supernode is entirely analogous with the 'hardware'
module. The CSIM GUI presents the supernode as having a thicker
border (see Figure 5). Supernodes have an interface drawn by the
CSIM GUI as small orange squares located at one end of an arc.
The connecting arc names these 'ports' and each port must be
attached to an arc in the higher-level DFG. Like the top-level
flow graph, supernodes can contain any combination of nodes, arcs,
and other supernodes (however recursion isn't allowed).
Nodes receiving signals from more than one connecting arc require
that all of these arcs' queues exceed their threshold size before
the node 'fires'. Thus, in Figure 6, the hardware associated with
both "Proc1" and "Proc3" must send two bytes to the hardware
associated with "Proc2" before this latter node is triggered.
Once triggered, it will thrice cycle between a delay of seven msec
followed by placing a byte into a queue designated for the node
named "Proc4". Likewise, once a node has gone through any
specified delay cycle, it places any bytes of data into the queues
of all attached arcs. So, for instance,
when the node "Proc3" in Figure 6 has delayed five msec, it
places a byte into queues designated for both "Proc2" and for "Proc4".
5.5 A Node to Device Mapping File: flow2map.csim
As noted in the prior subsection, nodes in the file flow2.dfg are
all assigned to indirect variable names: "Asource", "Asink",
"Bsource", and "Bsink". The single supernode is given the mapping
name "AsuperNode". The CSIM Scheduler (see Scheduler) processes DFGs
and associates these mapping names to hardware. (The Scheduler is
able to make this association by using a file named "netinfo"
produced in processing the associated hardware file.) Nodes that
are nested in a supernode are given a mapping name that is the
concatenation of the supernode mapping name, the delimiter "/",
and the nested node mapping name. Thus the DFG described by
flow2.dfg will yield four node to device mappings: "Asource",
"Asink", "AsuperNode/Bsource", and "AsuperNode/Bsink".
The hardware devices to which these nodes can be mapped are:
- From arch1.sim (Figure 1): "/source" and "/sink". (Top-level
names are preceded by the "/" delimiter.) The device "/Monitor"
of type "Monitor" will not handle 'software' instructions and so
would never be assigned with a node.
- From arch2.sim (Figure 3 and Figure 4): "/source", "/sink",
"/dual_processor/processor1" and "/dual_processor/processor2".
The missing link is an association between each possible DFG node
map, and any device names. This is accomplished by the file
flow2map.csim given in Listing 1. It is necessary to edit this file
when changing assignment of flow2.dfg nodes from arch1.sim to
arch2.sim. In particular, when the variable "usearch1" is defined
(as it is in Listing 1), the software node "AsuperNode/Bsource" is
assigned to the device "/source" found in arch1.sim. Otherwise,
it is assigned to the device "/dual_processor/processor1" found in
arch2.sim.
             Listing 1 - flow2map.csim

	<xml version="1.0" standalone="yes">
	<csim_sw_file>
	CGUIformatVersion 1.850000
	%define usearch1
	%ifdef usearch1
	  macro Asource             = /source
	  macro Asink               = /sink
	  macro AsuperNode/Bsource  = /source
	  macro AsuperNode/Bsink    = /sink
	%endif
	%ifndef usearch1
	  macro Asource             = /source
	  macro Asink               = /sink
	  macro AsuperNode/Bsource  = /dual_processor/processor1
	  macro AsuperNode/Bsink    = /dual_processor/processor2
	%endif
	</csim_sw_file>
5.6 Running the Demonstration Performance Models
All four combinations of running either DFG model "flow1.dfg" or
"flow2.dfg" on either architecture file "arch1.sim" or "arch2.sim"
will work. The operation extends the description to build and run
this model in Instructions to build a Performance Modeling Demo
and Instructions to run the simulation.
- Type "source ../../models/csimsetup".
- Type "gui arch1.sim" or "gui arch2.sim".
- Choose the menu item "Tools->Build Simulation" to compile the HW
architecture model.
- Choose the menu item "Tools->Build Routing Table" to construct
the network routing information tables.
- If you will choose to use the DFG "flow2.dfg", then edit the
mapping file "flow2map.csim". If you previously chose to use
"arch1.sim", then make sure there is a file entry "%define
usearch1". This will enable the first set of mappings in Table 2.
Otherwise, (if you previously chose "arch2.sim") remove this line,
or replace it with the 'C' comment "/* %define usearch1 */", or
replace it with the entry "%undef usearch1" to obtain the second
set of mappings in Table 2.
- Choose the menu item "File->Open->Open a new file" and then
choose the file "flow1.dfg" or "flow2.dfg". This step is
equivalent to exiting the GUI (choosing "File->Exit") and typing
"gui flow1.dfg" or "gui flow2.dfg".
- Choose the menu item "Tools->Build DFG SW" to build the SW model
and generate program instruction files (".prog files").
- Choose the menu item "Tools->Run Simulation" to run the
resulting simulation.
These four combinations of 'hardware' and 'software' models
demonstrate some of CSIM's ability to efficiently handle
performance modeling. Both 'hardware' and 'software' designs can
be constructed from the top down where a coarse model is refined,
and modules are added or replaced, as more information becomes
available. It is easy to see that one design group may be using a
particular 'hardware' and 'software' model set while a second
group alters the 'hardware' model and a third group modifies the
'software' model. At any time, and with an appropriate mapping
file, updated 'software' can be mapped to either an original or
updated 'hardware'. In this way, design tradeoffs can be
addressed in both a system's architecture and software design
while the system is being developed.
NESS TS
Dr. K. Burgess
Dr. R. Artz